Monday, May 30, 2011

Patriotic Panache


Remember this? I was in love with pom pom trim in the early '80s, and I could barely contain my excitement the other day when I saw a skirt edged with the delightful stuff at a swanky children's boutique. I snatched up some red trim and found the perfect glitzy, but not too glitzy fabric for two patriotic ensembles for my daughters.


I used the Warhol Dress pattern from Made to make the top and the Simple Skirt tutorial from Made as well. What can I say...Dana always has amazing tutorials!


I used the same tutorial for this top, but instead of sewing a long strip of fabric across the top, I made an oval that overlapped itself on one side. I lined it and added two pearl snaps so it's easy for my daughter to dress herself. I tucked the red fabric inside and top stitched all the way around. I was leery to try this neckline at first, but it was easier than I thought. I love how it turned out!

I hope you all have a wonderful Memorial Day. Aren't we lucky to have brave, unselfish people who are willing to serve America and risk their lives to protect ours? Thank you, veterans, for sacrificing so much. God bless America!

This post is linked to Delicate Construction and Tatertots and Jello.

Thursday, May 26, 2011

Tutorial: Cheerleader Bow


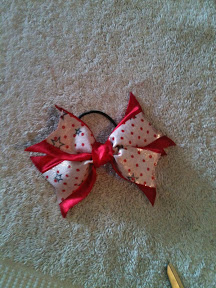
This style of bow is my most-requested product for cheer teams. It's perky, easy to make, and the material combinations are endless! I usually make mine from polyester satin fabric and polyester ribbon, but you can use pretty much anything you'd like. So, gimme a B-O-W and what does that spell? Cuteness!

Cheerleader Bow

Materials:
12x5" piece of fabric
12" piece of ribbon (any width)
3" piece of ribbon or fabric (for bow center)
Fusible webbing (I use Heat 'n Bond Extra Strength )
Wire (24-28 gauge)
Hair elastic or alligator clip
Pliers
Scissors
Glue gin and glue
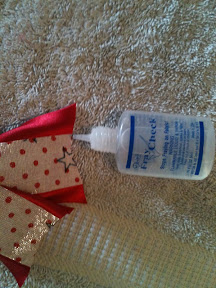
Fray Check Solution, wood burning tool, or clear nail polish
Iron and ironing board

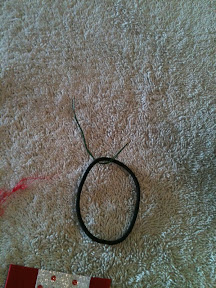
1. Cut three pieces of wire about six inches long. Bend each wire in half to look like a hairpin. Set them aside and iron your fabric piece so it's nice and smooth.

2. Use a ruler to cut a 2.25x12" piece of fusible webbing. Lay your fabric piece on the ironing board face down and place the strip of webbing right down the middle.


Iron it down (use the dry heat setting for your fabric. Since I used satin, my iron wasn't very hot) And let the fabric cool. Remove paper backing from webbing.

3. Carefully fold one edge of your fabric toward the center of the webbing strip. Iron it down, but be sure that your iron doesn't touch any exposed webbing. If it does, you'll have a gooey mess all over your iron (I learned the hard way...not fun). Repeat on both sides of fabric.


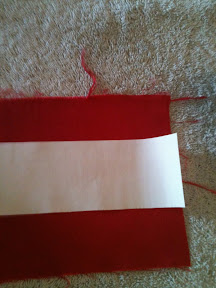
4. Cut a strip of fusible webbing that is 12 inches long and slightly narrower than your ribbon. Iron it to the back of the ribbon and let it cool. Peel off paper backing.

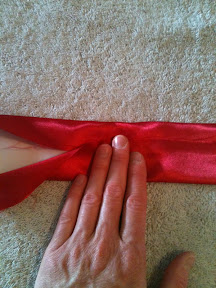
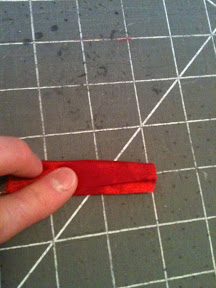
5. Place your ironed fabric piece seam side up on the ironing board. Position your ribbon on top of your seam and iron down.


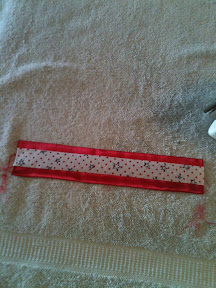
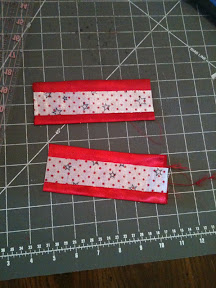
After it cools, trim off any extra threads. Cut the whole stack half, so you end up with two 6-inch pieces.


6. Grab those hairpins you made earlier and bend one of them into a hooked shape. If you're using an elastic, slip it onto the hook like this:


Lay it to the side for another minute.

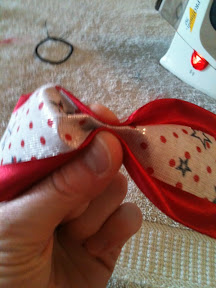
7. Take one of your fabric pieces and fold it in half like a book to gently crease the center. Pinch the edges toward the middle along the center crease and secure it with another one of your wire hairpins.


Make a lark's head knot by slipping the straight ends through the loop.


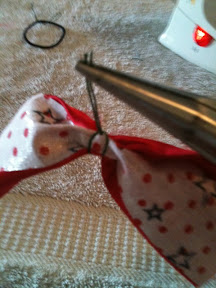
Use pliers to create leverage to get a nice, tight knot. Wrap the extra wire around the center of the fabric piece in the opposite direction to secure. Repeat with the other fabric piece.


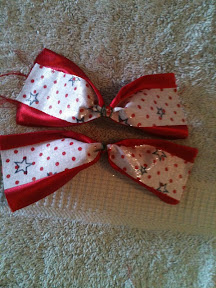
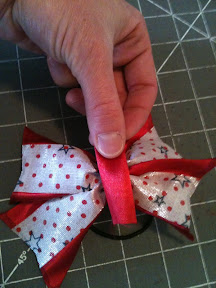
8. Use the last hairpin (with the elastic threaded on it) to tie the bow halves together. Use a lark's head knot again, and gently wiggle the bow streamers to arrange them Nicely while you tighten the knot. Wrap the loose wires around in the opposite direction like before.


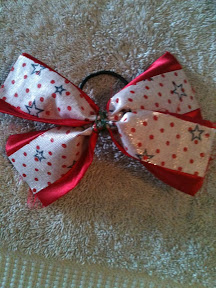
9. Put a small blob of hot glue on the front center of the bow. Stick the center of your 3-inch ribbon to the glue and let it dry. If you're using fabric, fold each long side in toward the middle. Glue it to the bow with the raw edges facing under.


Wrap the ends around and hot glue them in the back.


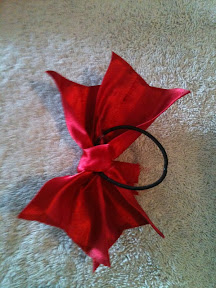
10. Trim off any extra threads or stray pieces. Trim the ends of each streamer into a notch, taking care to even up the length. Apply Fray Check or clear nail polish tithe cut ends to prevent fraying (or melt the edges carefully with a wood burning tool).


Ta da! You're all done. Now pull up your hair into a high ponytail and rock your cute new bow with a head nod and spirit fingers.

Friday, May 20, 2011

Tutorial: The Americana Hannah Tutu Skirt

I love to dress my two daughters in seasonal, holiday-inspired clothes. It's fun and festive, the girls get very excited to celebrate, and I think it makes the holidays even more special. Since I'm all about saving a dime or two, I was looking for a penny wise way to create a star-spangled tutu like the one I saw in Gymboree a few days ago. To make matters even more fun, my dear friend was visiting the States from Denmark. She has a daughter named Hannah who is 4 years old just like mine, so we went to work to make some truly American tutus.

Sorry the photo is bad! A new camera is on my list of things I really need.

I've always wanted to compose a tutorial for my projects, but I get going with the scissors and the thread and I forget to take photos along the way.
Here's my best (and first!) effort at instructions on how to make this cute skirt. I'm very sorry it doesn't include photos. Please leave a comment if you have any questions. I'd love to hear from you!

We hit JoAnn Fabric and purchased two navy blue fabrics from the Casa Collection, both in shimmery smooth and glittery finishes. Our original plan was to add red tulle between the layers of blue, but that ended up looking a little freakish. At the last minute (oh, how I despise those long lines at the cutting table at JoAnn...but it gives me time to think of more fabric that I just have to buy...a ploy, perhaps?), we saw some completely gaudy, red-white-and-blue-striped mesh complete with silver foil stars. I had my doubts at first, but my very stylish friend convinced me we could add a few random strips of it amid the navy blue and it'd look cute. We bought that too, and soon we were on our way. After stops more stops at Walmart and Hobby Lobby (I'll drive all over town to find a good deal...ha!), we were all set.

Two hours later, we had a super-cute, inexpensive tutu worthy of a 21-gun salute.
Here's my kind-of tutorial for the Americana Hannah Tutu Skirt in a size 4/5. The pattern is very forgiving, so it's easy to adjust for waist size and length.

Fabric (all 45" wide):
1/2 yard satin
1/2 yard tulle
1/4 yard shimmery smooth Casa Collection fabric
1/4 yard glittery Casa Collection fabric
1/4 yard stars and stripes mesh
Notions:
1.5 yards 3/4" knit elastic
3 yards single row sequins
Thread to match fabric and sequins

Cut the piece of satin from 1/2 yard down to your desired finished skirt length plus 2.5". Since I wanted my skirt to be 12" long, I went with 14.5". Serge the short edges together to make a big loop, and serge around the entire top and bottom to make sure there is no potential for fraying. Once finished, you'll have a loop that is 14.5"x22" when laid flat.

Next, lay out the tulle (folded in half to make a 4-layer strip of 9x45" tulle). On top of that, lay the shimmery, smooth fabric. Then add the mesh, and finally, the sparkle fabric. You should have yourself a great looking stack of fabric.

Serge along the long top edge of the whole stack, then bring the ends together (right sides facing each other), and serge the short ends together to make a loop like the satin one. Turn the loop of layered fabric right side out and add the single-row sequins to the very top layer of sparkle fabric. Be sure to sew in the same direction the sequins lie or you'll have a big mess on your hands. It should be looking fabulous already!

The tricky part comes next: Take the satin loop and iron one of the serged seams so it folds inward, toward the wrong side of the satin. Then, iron the other seam the other way, so it folds toward the shiny side of the satin. Confused? Sorry! Basically, one seam folds to the wrong side and the other seam folds opposite. Hem the seam that was folded toward the shiny side and that becomes the bottom of the skirt. Then, fold the other seam (folded toward the wrong side) down two more inches and iron. This becomes the shiny, satin waistband of the skirt.

So, this means that the exposed waistband (the two-ish inches that were folded down and ironed) are shiny. The rest of the shiny side is on the inside of the skirt. This is okay because the layered fabric covers the exposed dull side that ends up facing out. As a bonus, the skirt feels silky against the skin, which all three girls loved!

Add the layered fabric to the satin: First, lay the layered tube on the table with the seam toward you (this is the back of the skirt). Take the satin tube and place it inside the layered tube, also with the seam toward you. Line up the seams and the bottom of edges of both tubes. Then, carefully fold the pre-ironed waistband portion of the satin tube over the serged top edge of the layered tube. Pin it down in several places and use two pins on either side of the seam to remind yourself to leave an opening for the elastic to be threaded through the casing. Top stitch around the tube to secure all of the layers together, being sure to keep your needle about 1/8" from the edge of the folded portion.

Once finished, move your fabric over 1 inch and sew another seam right through the middle of the waistband, thus dividing the whole waistband into two almost-1-inch casings. Measure the waist of whoever will wear the skirt, cut two strips of elastic to that measurement, and thread it through both casings. Sew the ends of each strip of elastic together (be sure the elastic isn't twisted inside the casing), then stretch the elastic to smooth out the fabric while you stitch the casings closed. Ta da! All finished! I recommend hand washing and hanging to dry to preserve the crisp nature of the tulle.

Now put your tutu skirt on an adorable, sparkly, and patriotic little girl. She'll be Yankee-Doodle dandy and all set for Memorial Day, Flag Day, and Independence Day.

Good luck and happy sewing!


I'm linking to the